Photoshop Tutorial
Realistic Hair Change  By Lexxer
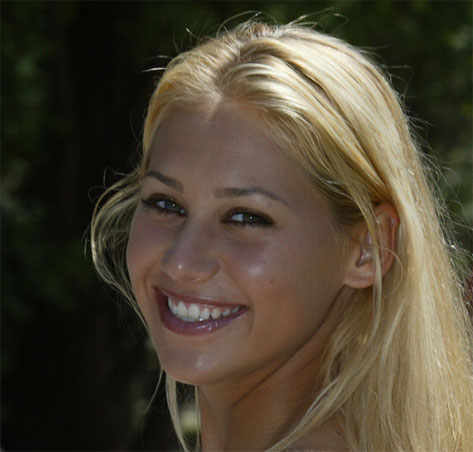
In this tutorial I will be showing you how to make a realistic hair color change. Get a picture of someone
you know, or a beautiful woman like Anna Kournikova. She's a Russian Tennis player.
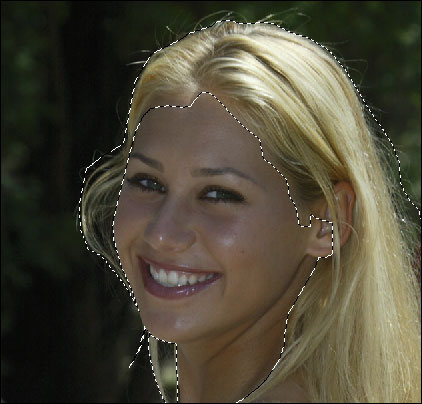
 1. Now the first and probably the most hardest thing is selecting the hair. Grab your Polygonal Lasso
Tool and Zoom In once or twice (CTRL +/-) Go along all of the hair from side to side top to bottom.
2. When selecting the hair, don't worry about selecting it exactly. If needed, select a little bit more
around the hair. Also, don't worry about single strands unless you are changing to a way darker/lighter
color though DO SELECT a large group of strands such as the ones on the right of the image. You should
get something like below,
1. Now the first and probably the most hardest thing is selecting the hair. Grab your Polygonal Lasso
Tool and Zoom In once or twice (CTRL +/-) Go along all of the hair from side to side top to bottom.
2. When selecting the hair, don't worry about selecting it exactly. If needed, select a little bit more
around the hair. Also, don't worry about single strands unless you are changing to a way darker/lighter
color though DO SELECT a large group of strands such as the ones on the right of the image. You should
get something like below,
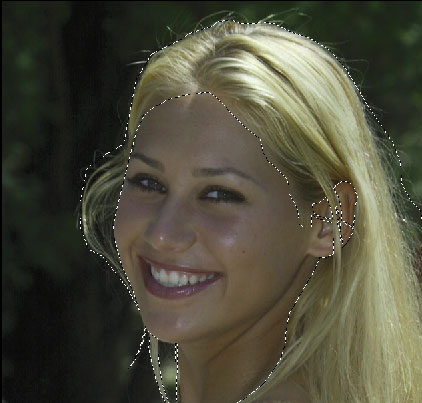
 3. Now is the time to actually DETAIL your selection. By Detail I mean cut out the area's that you won't
be coloring but have selected such as Anna's ear, which we had to select in order to get all of her hair.
With your Polygonal Lasso Tool selected, up by the top click >
3. Now is the time to actually DETAIL your selection. By Detail I mean cut out the area's that you won't
be coloring but have selected such as Anna's ear, which we had to select in order to get all of her hair.
With your Polygonal Lasso Tool selected, up by the top click >  (Highlighted One)
4. This will allow you to cut out parts of your selection. Go around the ears or whatever part of the
image that you don't need or want colored and carefully select the area. To get an Idea look at the
below image and the original selected picture above.
(Click To Enlarge) (Highlighted One)
4. This will allow you to cut out parts of your selection. Go around the ears or whatever part of the
image that you don't need or want colored and carefully select the area. To get an Idea look at the
below image and the original selected picture above.
(Click To Enlarge)
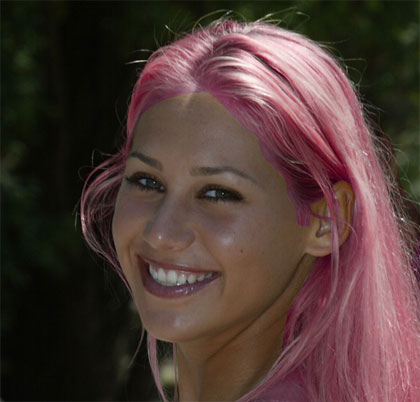
 5. Once you have the hair selected like so, Press CTRL C to copy, and then CTRL V to paste it on your
document. This will automatically make a new layer.
6. (With your Hair layer selected) Press CTRL U. This will bring up the Color Hue. In the bottom right
corner make sure colorize IS NOT selected, unless you don't like any of the Non-Colorize colors
(Which are more realistic looking than plain Colorize) It is also important, that with Non-Colorize
Hue Changes that you don't change the Saturation (Middle Slider Bar) anymore than +45 otherwise
it will look unrealistically burned, you'll know what I mean if you play with it.
7. Select the Hue that you think looks best (Or Switch to colorize and choose a color, but the result won't
be as realistic) and Press OK when finished.
8. Now as below the sides will look hard and choppy, we will fix that.
(Click To Enlarge)
5. Once you have the hair selected like so, Press CTRL C to copy, and then CTRL V to paste it on your
document. This will automatically make a new layer.
6. (With your Hair layer selected) Press CTRL U. This will bring up the Color Hue. In the bottom right
corner make sure colorize IS NOT selected, unless you don't like any of the Non-Colorize colors
(Which are more realistic looking than plain Colorize) It is also important, that with Non-Colorize
Hue Changes that you don't change the Saturation (Middle Slider Bar) anymore than +45 otherwise
it will look unrealistically burned, you'll know what I mean if you play with it.
7. Select the Hue that you think looks best (Or Switch to colorize and choose a color, but the result won't
be as realistic) and Press OK when finished.
8. Now as below the sides will look hard and choppy, we will fix that.
(Click To Enlarge)
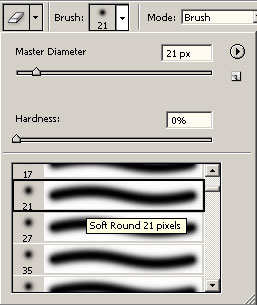
 9. Take out your Eraser Tool. Select a Brush with soft edges, they will work perfect with this tutorial. I'm
using the stock Photoshop Brush,
9. Take out your Eraser Tool. Select a Brush with soft edges, they will work perfect with this tutorial. I'm
using the stock Photoshop Brush,
 9. (Continued) Now set your Eraser at about 31% Opacity for the dark area such as Anna's Bangs (Area
Above the Forehead in Step 8's Picture) Lighten up the area and erase all the excess color and areas
where there isn't hair that shouldn't be colored. If 31% Opacity isn't enough don't increase the
percentage but go over the area a few more times.
10. Now if you look closely to the right we actually colored some of the photo. Oh No! lol. This can easily
be removed. Set the Erasers Brush to about 40% And lightly, without removing too much color from the
hairs in the area, erase some of the color that sticks out onto the picture. You don't need to go in
detail, just a swipe or two of the brush should work perfectly.
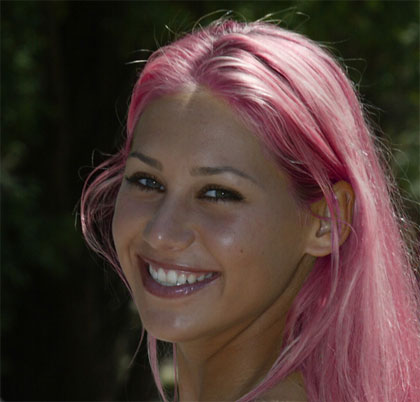
11F. When you are finished, you should come out with a flawless, realistic hair color change like in the
picture below. To show you how real it is show it to some friends and see if they can tell if it looks real
or not! Great way to proof your work, use your friends as Guinea Pigs
9. (Continued) Now set your Eraser at about 31% Opacity for the dark area such as Anna's Bangs (Area
Above the Forehead in Step 8's Picture) Lighten up the area and erase all the excess color and areas
where there isn't hair that shouldn't be colored. If 31% Opacity isn't enough don't increase the
percentage but go over the area a few more times.
10. Now if you look closely to the right we actually colored some of the photo. Oh No! lol. This can easily
be removed. Set the Erasers Brush to about 40% And lightly, without removing too much color from the
hairs in the area, erase some of the color that sticks out onto the picture. You don't need to go in
detail, just a swipe or two of the brush should work perfectly.
11F. When you are finished, you should come out with a flawless, realistic hair color change like in the
picture below. To show you how real it is show it to some friends and see if they can tell if it looks real
or not! Great way to proof your work, use your friends as Guinea Pigs  . .
 Hints & Tips: You can use the Eraser Tool and erase some of the color to add a streak effect in your
pictures hair. Also use the Image > Apply Image > Play with the Blending/Opacity to also add other
color effects to your hair. Have fun!!!
Hints & Tips: You can use the Eraser Tool and erase some of the color to add a streak effect in your
pictures hair. Also use the Image > Apply Image > Play with the Blending/Opacity to also add other
color effects to your hair. Have fun!!! |
