| Extruding geometry along a curve
Extruding geometry along a curve in MayaThis tutorial will give you a basic introduction on how we can extrude a Sub-D surface along a curve. This is something that could be handy for creating electrical wires or cables between objects, as well as creating tunnels and other similar objectsThe first thing we need to do after creating a new scene is to go ahead and create our curve. This is easiest done in the side view. Here you can create your nice up and down turns to your curve. Make sure you're in the modeling menu, you can select this either from the toolbar or buy hitting F3 on your keyboard. Then, from the "Create" menu, select the options for the CV Curve Tool shown below. This will bring up the following box. If you simply click "Reset Tool", and then close, you can begin to make your curve. This will bring up the following box. If you simply click "Reset Tool", and then close, you can begin to make your curve. This is the curve I created. You can see that the curve is not yet complete by the way it is displayed in the application. This is the curve I created. You can see that the curve is not yet complete by the way it is displayed in the application. After hitting enter, we have our completed curve. If you press F9, this will put you into component mode where you can select the CVs of the curve and start to move things around. After hitting enter, we have our completed curve. If you press F9, this will put you into component mode where you can select the CVs of the curve and start to move things around. In the perspective mode, go ahead and start grabbing CVz and just start moving them left-to-right along the X axis. In the perspective mode, go ahead and start grabbing CVz and just start moving them left-to-right along the X axis. Now you should have a rather bendy & twisty curve. Now you should have a rather bendy & twisty curve. The next thing we need to do is create another curve that's going to be extruded along the first curve we created. If you have your shelf up, you can go over to the "Curves" tab, and click the little circle icon. You can also do this by selecting Create -> NURBS Primitive -> Circle from the menus. Be sure to reset the options to their defaults when creating your circle so that it has a 360 degree sweep. The next thing we need to do is create another curve that's going to be extruded along the first curve we created. If you have your shelf up, you can go over to the "Curves" tab, and click the little circle icon. You can also do this by selecting Create -> NURBS Primitive -> Circle from the menus. Be sure to reset the options to their defaults when creating your circle so that it has a 360 degree sweep. Now we want to curve snap this to the end of the original curve we created. If you select the circle, then press the W key to invoke the move tool, you will be able to move your circle around the scene. If you press and hold down the C key on your keyboard, if your circle is selected, you can then just middle-mouse click on the curve & drag the circle along along it to the end of the curve. Be sure to drag the circle to the START of your curve (the starting end of your curve is shown in component mode as a little square, followed by a "U" symbol at the location of the next CV). This will help prevent any unpredictable or undesirable results in the extrude. Now we want to curve snap this to the end of the original curve we created. If you select the circle, then press the W key to invoke the move tool, you will be able to move your circle around the scene. If you press and hold down the C key on your keyboard, if your circle is selected, you can then just middle-mouse click on the curve & drag the circle along along it to the end of the curve. Be sure to drag the circle to the START of your curve (the starting end of your curve is shown in component mode as a little square, followed by a "U" symbol at the location of the next CV). This will help prevent any unpredictable or undesirable results in the extrude. Now that the circle is in the appropriate location, hit the "E" key on your keyboard to invoke the rotate tool, and rotate the circle so that it is perpendicular to the angle at the end of the curve. When rotated correctly, it should appear as though the curve were simply shooting right out of the center of the curve as in the image below. Now that the circle is in the appropriate location, hit the "E" key on your keyboard to invoke the rotate tool, and rotate the circle so that it is perpendicular to the angle at the end of the curve. When rotated correctly, it should appear as though the curve were simply shooting right out of the center of the curve as in the image below. Once your circle is correctly aligned, select it by clicking and dragging over it, then hold down the shift key and select your curve. Both objects should now be selected as above. Now we can go ahead and extrude. Personally, I like working with Sub-D geometry, as it gives me quite a bit more freedom to easily move geometry around before converting to nurbs or polygons for the final object. You can extrude from the "Surfaces" menu of the Modeling menu set as shown below. Bring up the options for extrude. Once your circle is correctly aligned, select it by clicking and dragging over it, then hold down the shift key and select your curve. Both objects should now be selected as above. Now we can go ahead and extrude. Personally, I like working with Sub-D geometry, as it gives me quite a bit more freedom to easily move geometry around before converting to nurbs or polygons for the final object. You can extrude from the "Surfaces" menu of the Modeling menu set as shown below. Bring up the options for extrude. In the options, go ahead and reset the settings from the "Edit" menu in the dialog below. Then switch "Orientation" to "Path Direction" and change "Output Geometry" to "Subdiv". In the options, go ahead and reset the settings from the "Edit" menu in the dialog below. Then switch "Orientation" to "Path Direction" and change "Output Geometry" to "Subdiv". Then click on Extrude, and you should see something similar to that below. Then click on Extrude, and you should see something similar to that below. Another reason I initially use Sub-D for something like this is so that it will give me a nice smooth render straight off the bat. As you can see in the render below (done at "Production" quality in the software renderer) we're getting some nice curves going along our extrusion. Another reason I initially use Sub-D for something like this is so that it will give me a nice smooth render straight off the bat. As you can see in the render below (done at "Production" quality in the software renderer) we're getting some nice curves going along our extrusion. Our curve is now created and you can proceed how you wish, however keep construction history in mind. The extrusion is currently getting history from both our original curve, and the circle. If you select the circle and scale it up, you can see how this affects our geometry. This could be handy for something like a tunnel or a water slide where you may need to animate fairly complex decent sized models traveling through the inside of it. Our curve is now created and you can proceed how you wish, however keep construction history in mind. The extrusion is currently getting history from both our original curve, and the circle. If you select the circle and scale it up, you can see how this affects our geometry. This could be handy for something like a tunnel or a water slide where you may need to animate fairly complex decent sized models traveling through the inside of it. If you scale down, you can see again that this affects our Sub-D geometry. This thinner extrusion could be useful for wires or cables, or if you really like to punish yourself, strands of hair (although, personally I wouldn't stick a few hundred thousand of these on a head model). You could, however, start off creating a large extrusion as above, and once created, if you modify the "Scale" property of the extrusion in the channel box or attribute editor, possibly create some nicely curved horns, to go on a head model or helmet, or to hang from a soldier's belt (vikings, etc). Along with the "Rotation" property, you can get some rather nice results for horns that will texture well. If you scale down, you can see again that this affects our Sub-D geometry. This thinner extrusion could be useful for wires or cables, or if you really like to punish yourself, strands of hair (although, personally I wouldn't stick a few hundred thousand of these on a head model). You could, however, start off creating a large extrusion as above, and once created, if you modify the "Scale" property of the extrusion in the channel box or attribute editor, possibly create some nicely curved horns, to go on a head model or helmet, or to hang from a soldier's belt (vikings, etc). Along with the "Rotation" property, you can get some rather nice results for horns that will texture well. Below you can see that we also get history on the original curve, as I've said before. If you select the curve, then hit F9 to go into component mode, you can select a couple of CVs, drag them around and see what's happening. Below you can see that we also get history on the original curve, as I've said before. If you select the curve, then hit F9 to go into component mode, you can select a couple of CVs, drag them around and see what's happening. So, as you can tell, simply extruding is not all we can do, and there are many applications where extruding along a curve can be extremely handy. There are many ways to edit your extrusion after you've created it to produce results that are desirable to your needs. Some of these ways are outlined above, as well as possible suggestions where this process may prove useful. So, as you can tell, simply extruding is not all we can do, and there are many applications where extruding along a curve can be extremely handy. There are many ways to edit your extrusion after you've created it to produce results that are desirable to your needs. Some of these ways are outlined above, as well as possible suggestions where this process may prove useful. If you have finished modifying your extrusion and are happy with your results - personally, I wasn't happy with the results after moving CVs shown in the image above, so I hit undo a couple of times to get back to my original extrusion - you can go ahead and delete the history for the curve as shown below. If you have finished modifying your extrusion and are happy with your results - personally, I wasn't happy with the results after moving CVs shown in the image above, so I hit undo a couple of times to get back to my original extrusion - you can go ahead and delete the history for the curve as shown below. Deleting the history will delete the association between the geometry and the circle & curve nodes. This will also remove the extrusion options available through the channel & attribute editors too (the rotate, scale, etc. mentioned above), so do not delete the history until you are definitely happy with the final result. If you are happy with the geometry, and have deleted the history, you can go ahead and select the circle, then shift+select the curve, as shown below. Deleting the history will delete the association between the geometry and the circle & curve nodes. This will also remove the extrusion options available through the channel & attribute editors too (the rotate, scale, etc. mentioned above), so do not delete the history until you are definitely happy with the final result. If you are happy with the geometry, and have deleted the history, you can go ahead and select the circle, then shift+select the curve, as shown below.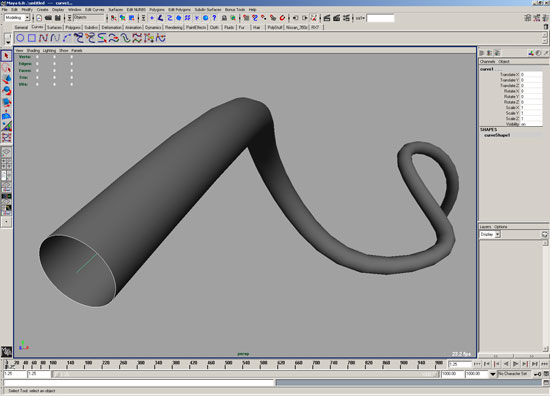 Then, simply hit the delete key on your keyboard. This will remove the circle & curve from your scene, there's no longer any history on the object, and you have your final geometry that you can go ahead and texture, or modify in whatever way you choose. For example, if you are creating electrical wires inside an electronic device, you may want to convert to a polygonal object, and then extrude a few faces inwards. With good texturing, this could give the impression of a hole in the plastic coating of the wire, allowing you to see the copper wires below. Then, simply hit the delete key on your keyboard. This will remove the circle & curve from your scene, there's no longer any history on the object, and you have your final geometry that you can go ahead and texture, or modify in whatever way you choose. For example, if you are creating electrical wires inside an electronic device, you may want to convert to a polygonal object, and then extrude a few faces inwards. With good texturing, this could give the impression of a hole in the plastic coating of the wire, allowing you to see the copper wires below.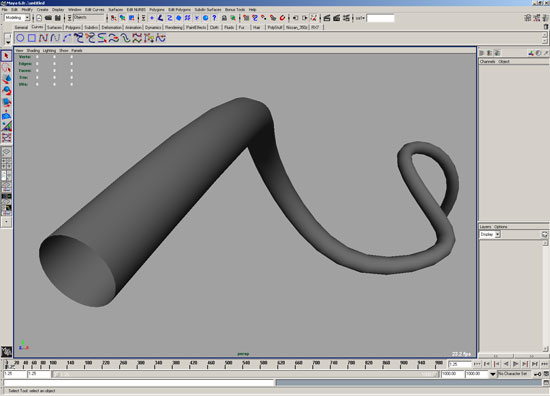
The possibilities with this technique are practically endless. It's an extremely useful modeling ability, and something everybody should learn to use to their advantage. Sometimes something like this can save you many hours attempting to model the object via other means (such as the horns I mentioned above). |
