
| HOME | TIPS & TRICKS | ARTICLES | RESOURCES | DIRECTORY | SITE MAP |
| Integrating MySQL to build a Login Application In the previous tutorial, we learnt how to set up a local testing server using Dreamweaver. This tutorial extends on that topic by adding MySQL support. This way we can access our Database through Dreamweaver and it will be a lot easier to code database commands and we can see the database layout right in Dreamweaver. As an example of how to do this, I will be creating a little login page which requires MySQL to validate the inputs from the user. And to make the whole thing even easier, we will even let Dreamweaver build the login script FOR US! Minimum Effort for a Maximum output. The Tutorial:
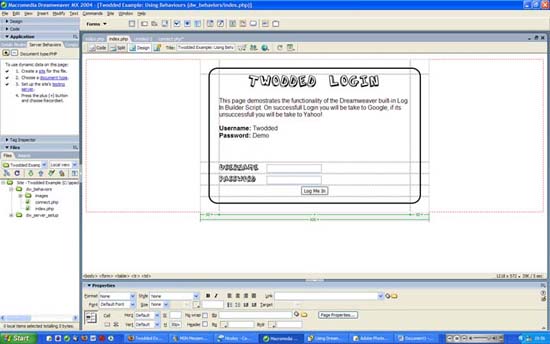
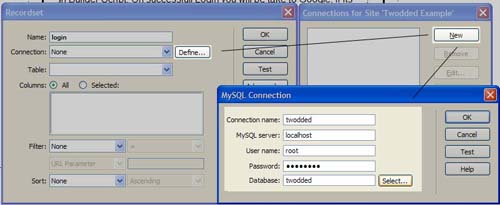
If you’re Dreamweaver looks a bit differently, this might be because you chose the “Design View” as a standard the first time you ran Dreamweaver. I am currently using the “Coder View”. There is no difference in performance, it just rearranges the windows to suit coders. As you can see on the bottom left, I am using my local server I set up in the first tutorial. The great thing is that now I can see all images and files in that folder in just one click and open or delete them. Above that you can see my “Server Behaviours” window, which we will be using in a second. If you do not have these two windows open, you can do so by accessing the “View” Menu in your Toolbar and choosing “Files” and “Server Behaviours”. First off we want to establish a connection to our MySQL database. For this we have to use the “Server Behaviours” Window. Click on the plus (+) sign and select “Recordset” from the menu. Now a little box will ask you for your MySQL Connection details. This should be very straight-forward, if you don’t understand something click on the help button or contact me
This little screenshot should illustrate what you should be doing right now. Remember to name your connection something that’s easy to remember, as you will have to refer to it later.
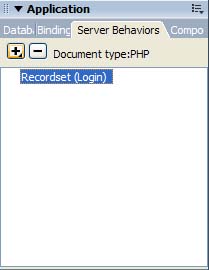
Now you want to build your login script. This can become a little hassle when you code it yourself, so why not let Dreamweaver do it for us. Click on the plus(+) sign again and this time select “User Authentication > Log In User”, as displayed below
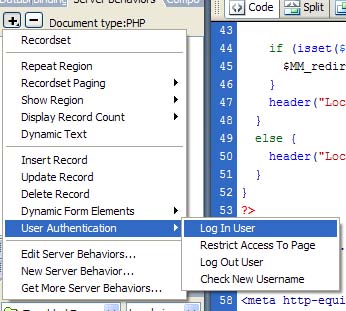
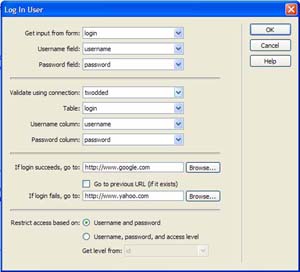
Now a little pop-up box appears. You enter the information it requests, below is a screenshot of the input I provided to make the example page work.
A little description of what every field requires: Get input from form: Select the form which will serve as the login form. For this to function your form will have to have a name, mines called “login” Validate using connection: Here you select the connection we just made. As you will remember mine was called “twodded”. The rest are extremely self-explanatory. As you can see if the login succeeds, my user will be redirected to Google, if it fails he will be directed to Yahoo. After selecting the OK button. You will notice a bunch of PHP code at the top of your page. Do not edit this, as this is the code which makes the magic work. Also there will be 2 new folders in your Server directory called “Connections” and “_mmServerScripts”. These folders stores all MySQL connection you will ever create on that server, and all scripts necessary for the login. Also be very careful not to delete those as they are also vital for a functioning website. If you now select F12 to test your page, you will have a working login script in a fraction of the time you normally would. Hope you enjoyed this tutorial and learned something new wink.gi
|
Copyright 2026 Freetechnique.com All rights reserved.
|